

Knitting For Beginners
Here’s our beginner’s guide to casting on, casting off, and knitting the basic stitches, so if you’ve always wanted to learn to knit, there’s no excuse not to have a go!
Top knitting tips
- Always knit a test square to check your tension. For example, the pattern may say your work should measure 10cm square over 22 sts and 30 rows. If your tension is tighter, you may need to try a larger needle, or a smaller one if your work is looser. Getting the correct stitch tension is more important than the row tension.
- New stitches are knitted onto the right needle, slipping old stitches off the left needle.
- When you finish a row, the left needle will be empty and the right needle full. Turn the right needle round to become the left needle and start knitting new stitches onto the empty right needle.
- When following a pattern, there will be a key to tell you what the abbreviations mean. For instance, ‘K1’ means knit one stitch, ‘sts’ means stitches.

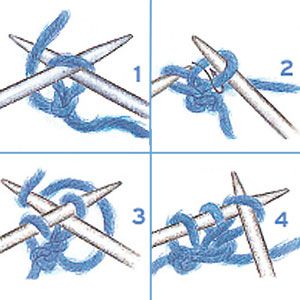
1. Make a slip knot and place it on a needle – pull the yarn to tighten it on the needle, so making the first stitch. Hold this needle in your left hand. Put the right hand needle into the stitch and loop the yarn under and around it.
2. With the right-hand needle, pull the loop of yarn through the stitch and slip the loop onto the left-hand needle to form a second stitch.
3. Put the right-hand needle between the two stitches you’ve just made. Loop the yarn under and around the right-hand needle as before.
4. With the right-hand needle, pull the loop of yarn through the stitch and slip the loop onto the left-hand needle to form the third stitch. Continue until you have the required number of stitches.
How to work knit stitches
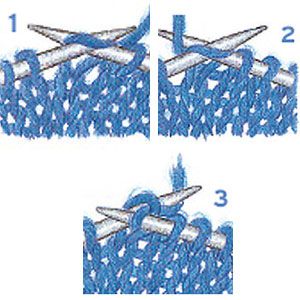
The knit stitch is also known as garter stitch.
1. With the yarn at the back of your work, slip the right-hand needle into the front of the stitch on the left-hand needle, bringing the point of the right-hand needle out behind the left-hand needle.
2. Pass the yarn around the right-hand needle as you did for casting on.
3. Pull the loop of yarn through the stitch to make a new stitch on the right-hand needle, sliding the old stitch off the left-hand needle. Continue to the end of the row.
How to work purl stitches
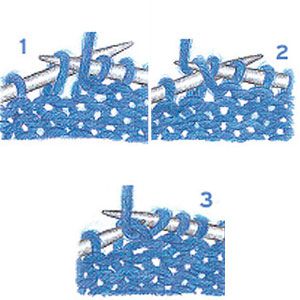
1. With the yarn at the front of the work, put the right-hand needle into the stitch on the left-hand needle, bringing the point out in front of the left-hand needle.
2. Pass the yarn over and around the right-hand needle as shown.
3. Pull the loop of yarn through the stitch to make a new stitch on the right-hand needle, slipping the old stitch off the left-hand needle. Continue to the end of the row.
How to cast off
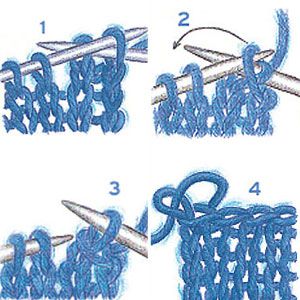
1. To cast off on a knit row, knit the first two stitches onto the right-hand needle. Keeping the yarn at the back of the work, put the left-hand needle into the first stitch, as shown.
2. Lift this stitch over the second stitch, taking it off the needle.
3. You will be left with one stitch on the right needle. Knit another stitch and repeat to the end of the row.
4. When there is only one stitch left, slip this off the needle and thread the yarn through the loop to secure it.
And once you learn to knit…
Try making a simple scarf: cast on enough stitches for your desired scarf width. Knit until the scarf is long enough.
Knit the scarf entirely in garter stitch, or try knit and purl stitches on alternate rows, for stocking stitch. You can also try ‘knit one, purl one’ for a ribbed effect, or ‘knit two, purl two’ for a more defined rib.


